Create Browser app like Chrome ,Mozilla / Firefox, Internet explorer, or like Opera etc. Now We are Design a browser app by help of Android Studio latest version . step by step Description !.
In this Section we will be saying that google play store is very good platform to store our App on Play Store .We can easily handle our apps and Update our App Time to Time ..Google play store are not take much more time in Update .For More You Can Download and Install My All App on Google Play Store….
Web Browser App Visit My YouTube Video
Visit my Google Play Store Apps Click on this Link
Visit For Browser 5 G App On google Play Store>>>>>>>>>>
This My Creative App Click on DeepCrazyWorld App>>>>>>>>>>>
To Solve Your Math Calculation Math Solve App >>>>>
Spinner Bottle Game App>>>>>>>>>>>>>>>>>>>>>
This News Nation App News7on>>>>>>>>>>>>>>
Shopping App ZampKart >>>>>>>>>>>>>>>>>>>
Math Equation Solving App>>>>>>>>>>>>>>>>>>>
Event Basis Picture LovingCaring143 App>>>>>>>>>
Here This Blogger Site App to Explore Your Knowledge Download all this Apps By Google Play Store My Blogger Site App Download And Install
Click on Link CrazyCoder>>>>>>>>>>
Step Wise Follow this process
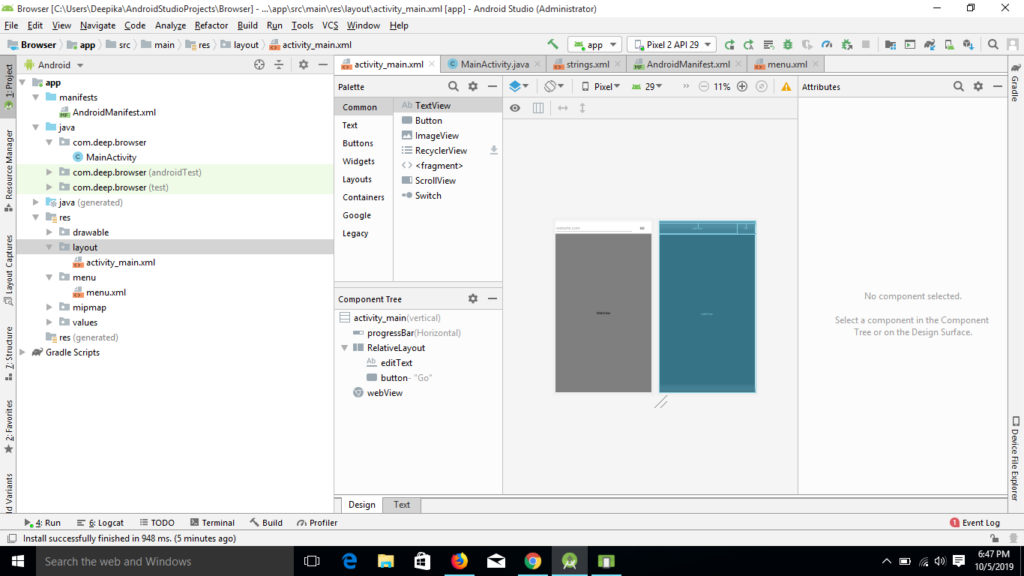
Step 1: First we Create Browser Project name.you can give any name of your project, now we choose Empty Layout then we click next Button Build The process after some minutes .
Step 2: Now we Our Browser project build successfully . Then we create a XML we are giving this code you can simply copy this code and paste it on your project directly , after paste out code you can change your package name according to your choice .
Here my package name is com.deep.browser , but for you instructions than you can change this package name according to you set your layout its background color and also its background Image etc.
<?xml version="1.0" encoding="utf-8"?>
<LinearLayout xmlns:android="http://schemas.android.com/apk/res/android"
    xmlns:app="http://schemas.android.com/apk/res-auto"
    xmlns:tools="http://schemas.android.com/tools"
    android:layout_width="match_parent"
    android:layout_height="match_parent"
    android:id="@+id/activity_main"
    android:background="#ffffff"
    android:orientation="vertical"

    android:paddingLeft="0dp"
    android:paddingRight="0dp"
    android:paddingTop="0dp"
    tools:context=".MainActivity">

    <ProgressBar
        android:id="@+id/progressBar"
        style="?android:attr/progressBarStyleHorizontal"
        android:layout_width="match_parent"
        android:layout_height="8dp"/>


        <RelativeLayout
            android:layout_width="match_parent"
            android:layout_height="wrap_content">

            <EditText
                android:id="@+id/editText"
                android:layout_width="200dp"
                android:layout_height="wrap_content"
                android:layout_alignParentLeft="true"
                android:layout_centerVertical="true"
                android:layout_toLeftOf="@+id/button"
                android:layout_toStartOf="@+id/button"
                android:hint="website.com"
                android:inputType="text"
                android:text=""/>

            <Button
                android:id="@+id/button"
                style="@style/Widget.AppCompat.Button.Borderless"
                android:layout_width="80dp"
                android:layout_height="wrap_content"
                android:layout_alignParentRight="true"
                android:layout_centerVertical="true"
                android:text="Go"/>
        </RelativeLayout>

    <WebView

        android:id="@+id/webView"

        android:layout_width="match_parent"
        android:layout_height="match_parent"
        android:background="#FCFCFC"></WebView>

</LinearLayout>
Step 3: Here after completed this activity_main.xml source code files then we will be require that MainActivity.java .
Now we put this given Main Activity.java Source code in your Browser project File . In this Project we take These Constraint Layout.
Which is given this we can simply drag this Buttons and Drop this buttons on your Android Layout App in Android studio And Second Method is we can easily write the code of these constraint layout in XML file .
Which is given this code in our blog you can simply copy and paste it in your activity_main.xml this is second method for design the layout and you can colored it for more making more attractive App Only Depends upon according to your choice . We only add this code.
WebView webView;
ProgressBar progressBar;
EditText editText;
Button button;
JAVA File Android studio
This is called main Part of Main Activity We will be simply takes these buttons for making this project Now this is Full Code of Main Activity you can copy this code and paste it on your Browser Project.
If you have any problem or Show any Error than You can Click Alt+Enter for add Packages and API . because If Your Android Version is different than
some time it take some error show. so its not very big problem so keep it up .
package com.deep.browser;

import androidx.annotation.NonNull;
import androidx.appcompat.app.AppCompatActivity;

import android.content.Context;
import android.graphics.Color;
import android.os.Bundle;
import android.view.Menu;
import android.view.MenuInflater;
import android.view.MenuItem;
import android.view.View;
import android.view.inputmethod.InputMethodManager;
import android.webkit.CookieManager;
import android.webkit.WebChromeClient;
import android.webkit.WebResourceRequest;
import android.webkit.WebView;
import android.webkit.WebViewClient;
import android.widget.Button;
import android.widget.EditText;
import android.widget.ProgressBar;

public class MainActivity extends AppCompatActivity {

    WebView webView;
    ProgressBar progressBar;
    EditText editText;
    Button button;

    @Override
    protected void onCreate(Bundle savedInstanceState) {
        super.onCreate(savedInstanceState);
        setContentView(R.layout.activity_main);

        editText = (EditText) findViewById(R.id.editText);
        button = (Button) findViewById((R.id.button));
        progressBar = (ProgressBar) findViewById((R.id.progressBar));
        progressBar.setMax(100);
        progressBar.setVisibility(View.GONE);

        webView = (WebView) findViewById(R.id.webView);

        if(savedInstanceState !=null)
        {
            webView.restoreState(savedInstanceState);

        }
        else {
            webView.getSettings().setJavaScriptEnabled(true);
            webView.getSettings().setSupportZoom(true);
            webView.getSettings().setBuiltInZoomControls(false);
            webView.getSettings().setLoadWithOverviewMode(true);
            webView.getSettings().setUseWideViewPort(true);
            webView.setScrollBarStyle(View.SCROLLBARS_INSIDE_OVERLAY);
            webView.setBackgroundColor(Color.WHITE);

            webView.setWebViewClient(new onViewClient());

            webView.setWebChromeClient(new WebChromeClient(){
                @Override
                public void onProgressChanged(WebView view, int progress) {
                   progressBar.setProgress(progress);
                   if(progress < 100 && progressBar.getVisibility() == ProgressBar.GONE){
                       progressBar.setVisibility(ProgressBar.VISIBLE);
                   }
                   if(progress == 100){
                       progressBar.setVisibility(ProgressBar.GONE);

                   }

                }
            });

        }
        button.setOnClickListener(new View.OnClickListener() {
            @Override
            public void onClick(View view) {
                InputMethodManager inputMethodManager = (InputMethodManager) getSystemService(Context.INPUT_METHOD_SERVICE);
                inputMethodManager.hideSoftInputFromWindow(getCurrentFocus().getWindowToken(), InputMethodManager.HIDE_NOT_ALWAYS);
                webView.loadUrl("http://" + editText.getText().toString());
                editText.setText("");
            }
        });
    }

    public  class onView extends WebViewClient{
        @Override
        public boolean shouldOverrideUrlLoading(WebView view,String url) {
        view.loadUrl(url);
            CookieManager.getInstance().setAcceptCookie(true);
            return true;
        }

        @Override
        public void onPageFinished(WebView view, String url) {
            super.onPageFinished(view, url);
        }
    }

    @Override
    protected void onSaveInstanceState(Bundle outState) {
        super.onSaveInstanceState(outState);
        webView.saveState(outState);

    }

    @Override
    public boolean onCreateOptionsMenu(Menu menu) {
        MenuInflater inflater = getMenuInflater();
        inflater.inflate(R.menu.menu, menu);
        return super.onCreateOptionsMenu(menu);
    }

    @Override
    public boolean onOptionsItemSelected(MenuItem item) {
        switch (item.getItemId()) {
            case R.id.item_back:
                if(webView.canGoBack()){
                    webView.goBack();
                }
                return true;

            case R.id.item_forward:
                if(webView.canGoForward()){
                    webView.goForward();
                }
                return true;

            case R.id.item_home:
                InputMethodManager inputMethodManager = (InputMethodManager) getSystemService(Context.INPUT_METHOD_SERVICE);
                inputMethodManager.hideSoftInputFromWindow(getCurrentFocus().getWindowToken(), InputMethodManager.HIDE_NOT_ALWAYS);
                webView.loadUrl("https://google.com/search?igu=1");
                editText.setText("");

                return true;

            default:

                return super.onOptionsItemSelected(item);
        }
    }

    private class onViewClient extends WebViewClient {
    }
}
Step 4:
After Complete this all three Steps We move on Fourth Steps. In Step 4 we will discuss about Internet Permission For This Process Changing will occur in Android Manifest file , in this Android-manifest we give Internet Permission
For Accessing Google.com Services with easily . we add this Section
<uses-permission android:name="android.permission.ACCESS_NETWORK_STATE"/> <uses-permission android:name="android.permission.INTERNET"/>
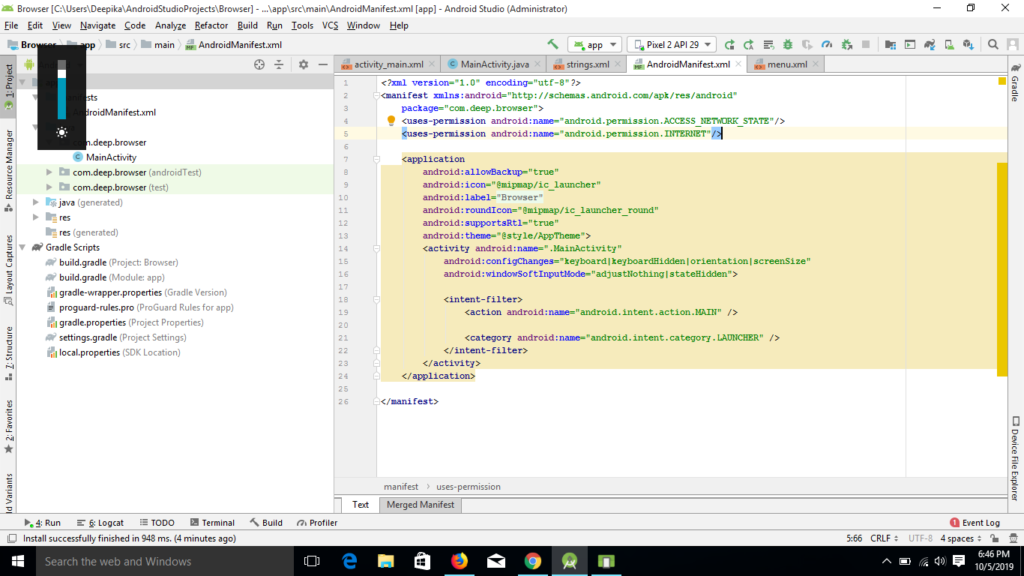
This is full code of AndroidManifest.xml
<?xml version="1.0" encoding="utf-8"?>
<manifest xmlns:android="http://schemas.android.com/apk/res/android"
    package="com.deep.browser">
    <uses-permission android:name="android.permission.ACCESS_NETWORK_STATE"/>
    <uses-permission android:name="android.permission.INTERNET"/>

    <application
        android:allowBackup="true"
        android:icon="@mipmap/ic_launcher"
        android:label="@string/app_name"
        android:roundIcon="@mipmap/ic_launcher_round"
        android:supportsRtl="true"
        android:theme="@style/AppTheme">
        <activity android:name=".MainActivity"
            android:configChanges="keyboard|keyboardHidden|orientation|screenSize"
            android:windowSoftInputMode="adjustNothing|stateHidden">

            <intent-filter>
                <action android:name="android.intent.action.MAIN" />

                <category android:name="android.intent.category.LAUNCHER" />
            </intent-filter>
        </activity>
    </application>

</manifest>
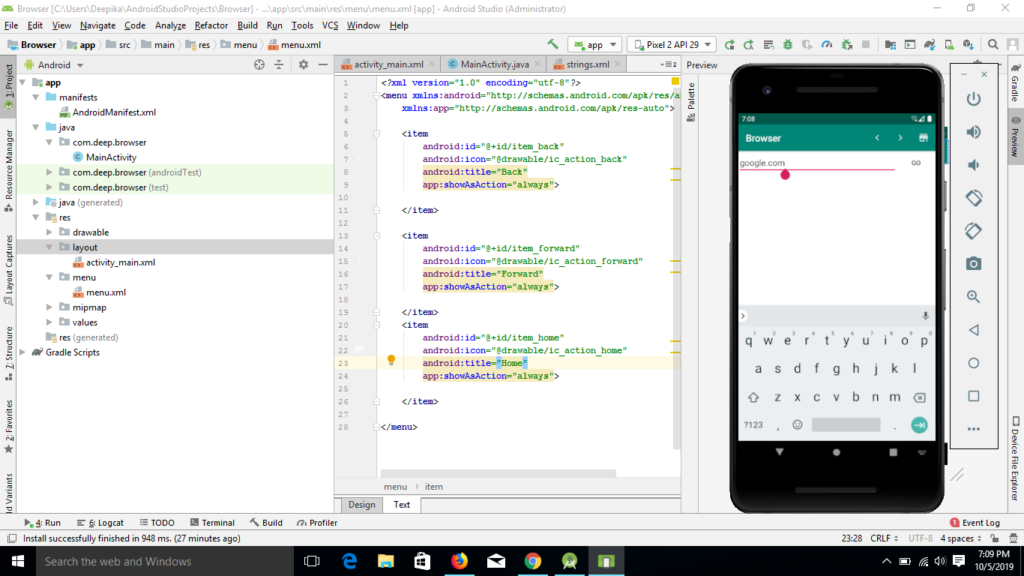
Step 5: Now We create menu.xml for creating munu.xml
click on res-> Right Click -> New -> Android Resource File then give name
menu and click OK. after making this menu.xml file we will copy and paste this given code on browser project. In this menu.xml file we design all required buttons back , Forward , Home Icon Button for more attractive and for making easy processing.This is menu.xml code .
<?xml version="1.0" encoding="utf-8"?>
<menu xmlns:android="http://schemas.android.com/apk/res/android"
    xmlns:app="http://schemas.android.com/apk/res-auto">

    <item
        android:id="@+id/item_back"
        android:icon="@drawable/ic_action_back"
        android:title="Back"
        app:showAsAction="always">

    </item>

    <item
        android:id="@+id/item_forward"
        android:icon="@drawable/ic_action_forward"
        android:title="Forward"
        app:showAsAction="always">

    </item>
    <item
        android:id="@+id/item_home"
        android:icon="@drawable/ic_action_home"
        android:title="Home"
        app:showAsAction="always">

    </item>

</menu>
Step 6: Here in this step add this given code strings.xml
<resources>
    <string name="app_name">Browser</string>
</resources>
Now after completed this project , we can change logo of this browser app. for changing this logo we require size of logo 512 PX and 512 PX with height and width. Then after completed this browser app project .
we publish this browser app on Google play store for publish Any Android App Required this all Things for google play store.
How to Upload android App on google play Store 2019 !
Requirement of publishing android app on google play sore Open your Google Play Console With Help of Internet.
1) Generate Signed apk
YouTube Video
1 )How to generate signed apk file in android studio for publishing app on play store
click this link and generate signed apk file step by step for play store.
2) Take a logo for this app , and its size with 512 PX height and 512 width require.
3) required a banner for our android app publishing on play store and its size also 1024 PX and 500 PX.
Step 4 – important details
4) need a short description and A very long Description about your app. You can write any this about your app and give your blogger site name also , Now Completed This Section we need for privacy policy like this
We can published our app on google play sore with This Video will Help In your publish app
click on this link
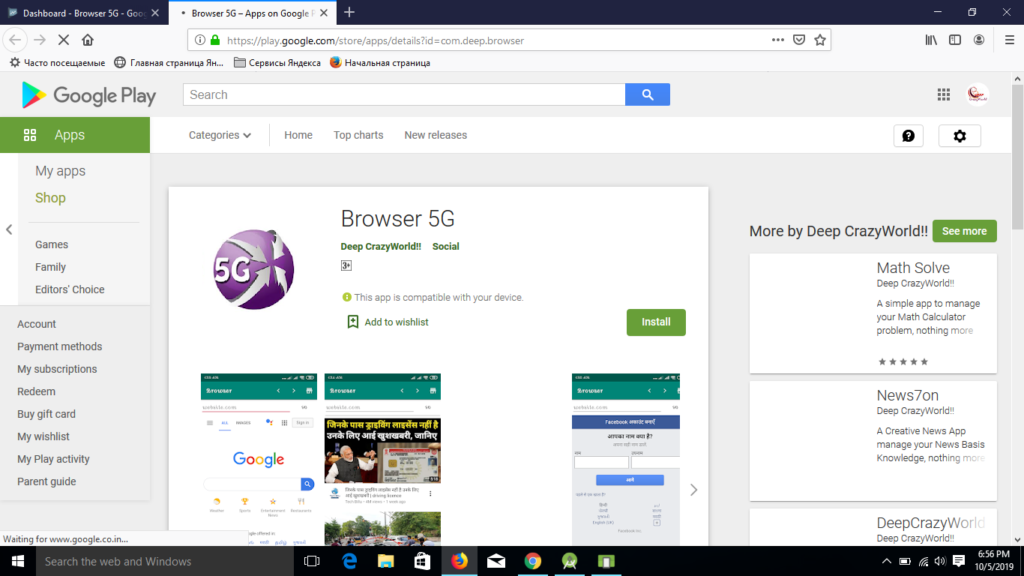
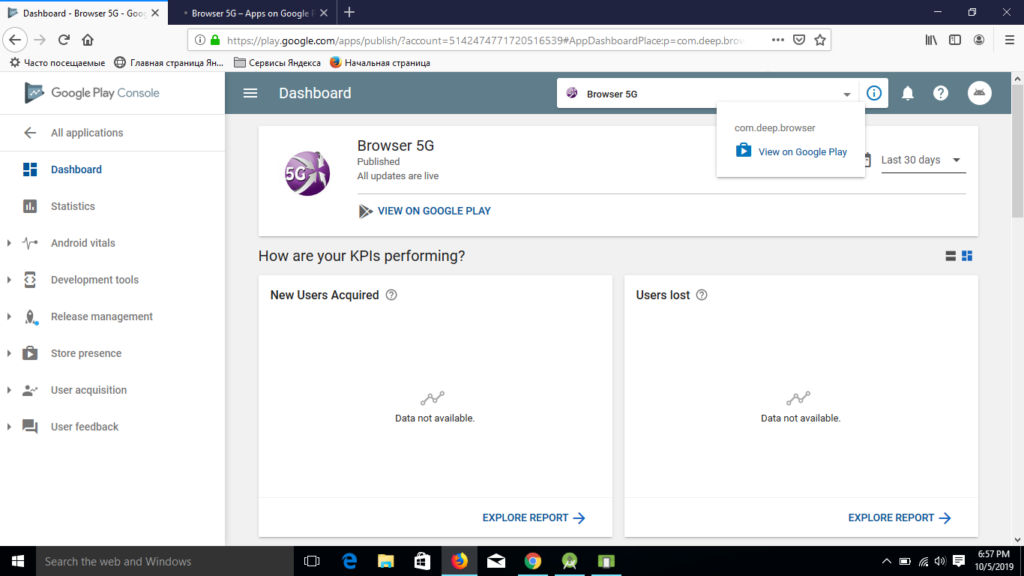
Published This Browser 5 G app on Google Play Sore ,
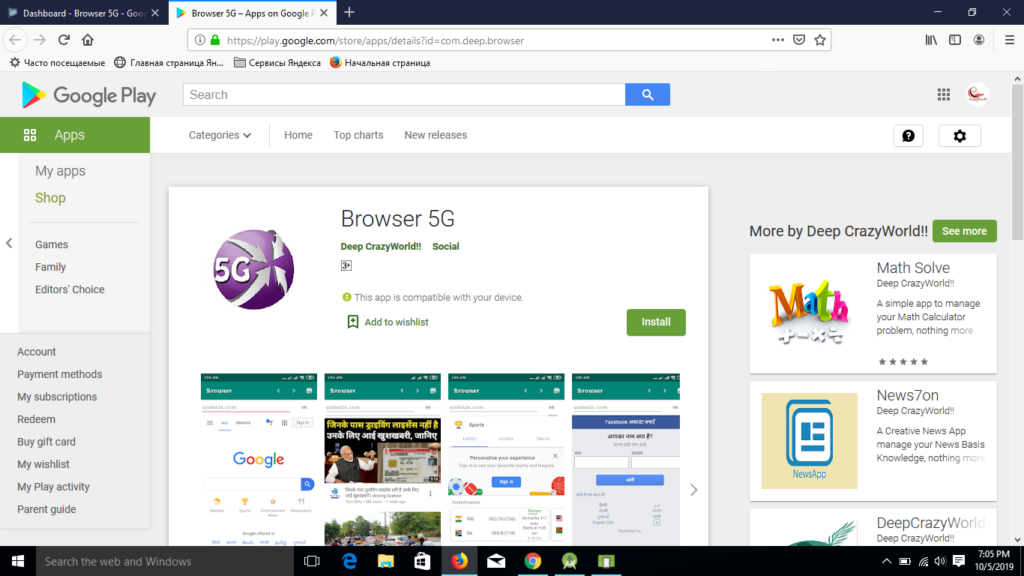
Click On this link and download this app ,for Internet surfing with very good
Internet speed with Free App. After Publishing App Looked Like This
Click Me
Download Browser 5 G App
How to Update Android App in google play console .
Update Android App Click Me>>>
We Can Change Title Name, apk file and its version, screen shot pic and more details after publish android app on google play sore .
Enjoy This App!